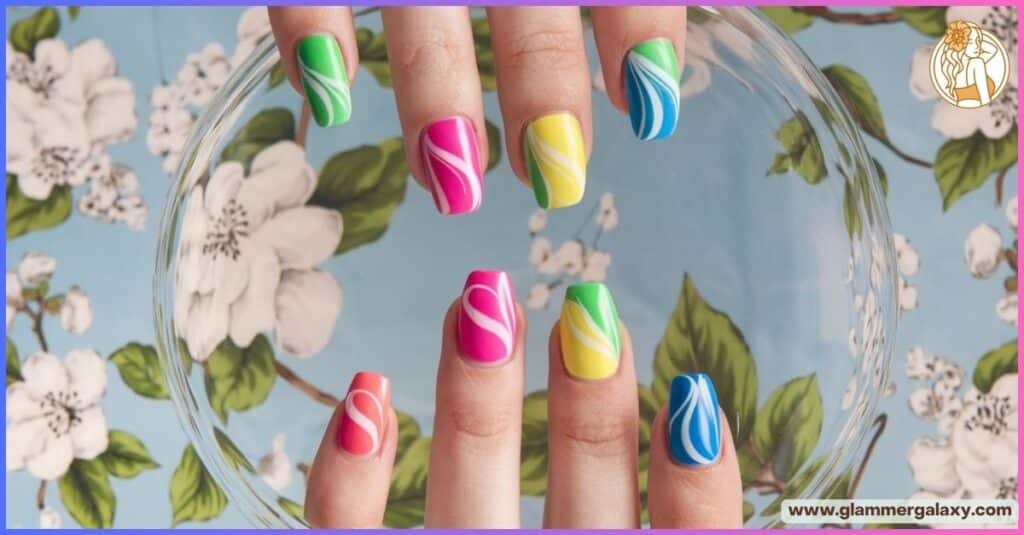
Swirl nail designs are taking the nail art world by storm, and it’s easy to see why. These mesmerizing patterns can transform your nails from mundane to magnificent in minutes.
Discover 19 jaw-dropping looks that’ll have everyone asking, “Where did you get your nails done?”
The Art of the Swirl: Techniques and Tools
Before we jump into the designs, let’s talk technique. Creating the perfect swirl isn’t just about having a steady hand (though that certainly helps). It’s about understanding the tools and methods that’ll make your nail art designs pop.
Freehand vs. Stencil Methods
- Freehand: This method requires a bit more practice but offers unlimited creativity. Use a thin brush or nail art pen to create your swirls. Start with simple patterns and work your way up to more complex designs as your confidence grows.
- Stencils: Perfect for beginners or those short on time. Simply place the stencil on your nail and paint over it. Remove the stencil carefully to reveal a perfect swirl pattern. This method ensures consistency across all nails.
Essential Tools for Perfect Swirls
- Fine-tipped brushes: Invest in a set of quality brushes with varying tip sizes for different swirl thicknesses.
- Dotting tools: Great for adding accents and creating perfectly round dots.
- Nail art tape: Use to create clean lines and geometric patterns in your swirl designs.
- Nail art pens: These allow for precise control and are perfect for intricate details.
- Stencils: A lifesaver for complex designs or when you’re short on time.
- Striping tape: Ideal for creating thin, consistent lines in your swirl patterns.
Pro Tip: Invest in a good quality nail art brush set. It’ll make all the difference in your swirl game! Look for brushes with synthetic bristles as they tend to be more durable and easier to clean.
Color Theory in Swirl Designs
Understanding color theory can elevate your nail fashion from good to great. Let’s break it down:
Complementary Color Combos That Pop
Complementary colors sit opposite each other on the color wheel. When used together, they create a vibrant, eye-catching effect.
| Color 1 | Color 2 | Effect |
| Blue | Orange | Energetic and bold |
| Purple | Yellow | Regal and attention-grabbing |
| Green | Red | Festive and lively |
| Teal | Coral | Tropical and fresh |
| Lavender | Chartreuse | Unexpected and modern |
Experiment with different shades and tints of these complementary pairs to find your perfect combination.
Monochromatic Magic
Don’t underestimate the power of a single color family. Monochromatic swirls create a sophisticated, cohesive look.
Example: Try varying shades of purple, from lavender to deep plum, for a royal effect. Here’s a sample monochromatic palette:
- Pale lavender
- Lilac
- Medium purple
- Deep violet
- Eggplant
The key to a successful monochromatic look is varying the intensity and brightness of your chosen color.
Analogous Color Schemes
Analogous colors are next to each other on the color wheel. They create a harmonious, soothing effect perfect for more subtle swirl designs.
Example: A blue-green analogous palette might include:
- Sky blue
- Turquoise
- Teal
- Seafoam green
- Mint
19 Swirl Designs to Rock Your World
Now, let’s dive into the designs that’ll make your nails the talk of the town!
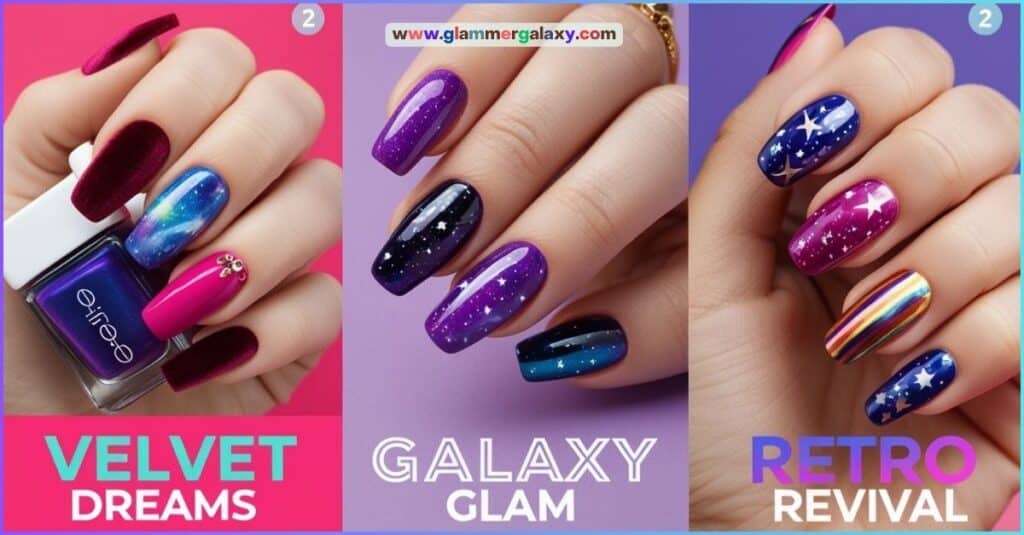
Velvet Dreams: Textured Swirls
Velvet nails are all about that luxe, touchable texture. Here’s how to nail the look:
- Apply a base coat in your chosen color.
- Use a magnetic polish for the swirl pattern.
- While still wet, hold a magnet over the nail to create the swirl effect.
- Finish with a matte top coat for that velvety feel.
Color Combos to Try:
- Deep burgundy with gold swirls
- Navy blue with silver accents
- Forest green with bronze details
The key to achieving the perfect velvet look is in the finish. The contrast between the matte background and the shimmering swirls creates that coveted velvet-like appearance.
Galaxy Glam: Shimmering Celestial Swirls
Take your nails to the stars with these out-of-this-world shimmer nail designs.
- Start with a dark base (black or deep blue work well).
- Add swirls of purple, blue, and pink using a thin brush.
- Dot on white for stars using a toothpick.
- Layer holographic glitter for that cosmic sparkle.
Pro Tip: Use a makeup sponge to dab on the colors for a more nebulous effect. This technique helps blend the colors seamlessly, creating a truly galactic look.
To enhance the cosmic effect, consider adding:
- Tiny silver stars (you can find these in nail art supply stores)
- A dusting of fine silver glitter over the entire nail
- A glossy top coat to really make the design shine
Retro Revival: Mod Nail Designs
Channel your inner 60s icon with these groovy mod nail designs.
- Start with a white base.
- Use black polish to create bold, curved lines.
- Fill in some sections with bright colors like orange, yellow, or green.
- Seal with a glossy top coat for that vinyl record shine.
Fun Fact: Mod fashion originated in London in the late 1950s and peaked in the mid-1960s. It was characterized by bold geometric patterns and bright colors.
To really nail the mod look, consider incorporating:
- Checkerboard patterns
- Polka dots
- Concentric circles
Remember, symmetry is key in mod designs, so take your time to ensure your lines are clean and your shapes are well-defined.
See Also : 17 Stunning Butterfly Nail Art Designs to Enhance Your Manicure
Negative Space Marvels
Multicolor negative space designs are all about what you don’t paint. Here’s how to master this minimalist look:
- Apply base coat to clean, shaped nails.
- Use striping tape to create swirl shapes.
- Paint over the entire nail with your chosen colors.
- Carefully remove the tape while the polish is still wet.
- Seal with a top coat.
Color Combinations to Try:
- Clear base with pastel swirls
- Nude base with neon accents
- White base with metallic swirls
The beauty of negative space designs lies in their versatility. You can go bold with bright colors or keep it subtle with nude tones. The unpainted areas of your nail become part of the design, creating a modern, edgy look.
Earth Tones Reimagined: Abstract Neutral Designs
Who says neutrals have to be boring? These abstract neutral designs prove otherwise.
- Choose a palette of earth tones (think beige, brown, terracotta).
- Use a thin brush to create abstract swirls and shapes.
- Add texture with matte and glossy top coats.
Inspiration: Look to nature for color ideas – think desert landscapes or autumn leaves.
To elevate your earth tone design:
- Incorporate metallic accents for a touch of glamour
- Use a dry brush technique for a watercolor effect
- Add tiny leaf or branch designs for a nature-inspired twist
Barbie World: Pink Perfection
Embrace your inner Barbie with these playful Barbie nail designs.
- Start with a bubblegum pink base.
- Add swirls of hot pink and white.
- Incorporate tiny hearts or stars for extra cuteness.
- Finish with a high-shine top coat.
Quote: “Life in plastic, it’s fantastic!” – Aqua, “Barbie Girl”
To make your Barbie nails even more fabulous:
- Add a touch of glitter to the swirls for extra sparkle
- Incorporate tiny bow designs
- Use a pale pink as a base for a more subtle Barbie look

Ocean Waves: Blue French Tips
Give the classic French manicure a seaside twist with these blue French tips.
- Apply a sheer pink or nude base.
- Use a thin brush to create wavy blue lines at the tips.
- Add white swirls to mimic sea foam.
- Seal with a glossy top coat for that water-like shine.
Did You Know?: The French manicure was actually created in California in the 1970s by Jeff Pink, founder of Orly nail polish.
To enhance the ocean wave effect:
- Use a gradient of blues from light to dark
- Add tiny seashell or starfish designs
- Incorporate a subtle shimmer polish for a wet-look effect
Petite Powerhouse: Short Nail Designs
Don’t let short nails cramp your style! These short nail designs pack a punch.
- Keep the base light to make nails appear longer.
- Use thin, elongated swirls to create the illusion of length.
- Add a vertical line down the center of each nail for extra lengthening effect.
Optical Illusion Tip: Vertical stripes make nails appear longer, while horizontal ones can make them look wider.
To maximize the impact of your short nail design:
- Use a nude base color close to your skin tone
- Keep designs simple and uncluttered
- Consider a subtle ombré effect for added depth
Midnight Mystery: Matte Black Designs
There’s something undeniably chic about matte black designs. Here’s how to nail the look:
- Apply two coats of black polish.
- Use a glossy black or dark gray for the swirls.
- Finish with a matte top coat for that velvety finish.
Contrast is Key: The subtle difference between matte and glossy black creates a sophisticated, eye-catching effect.
To add intrigue to your matte black design:
- Incorporate negative space elements
- Add a single rhinestone or stud for a touch of glamour
- Use dark charcoal or navy for the swirls for a subtle color variation

Crimson Chronicles: Shades of Red Designs
Red nails never go out of style. These shades of red designs take the classic look to new heights.
- Start with a light red base.
- Add swirls of darker reds, from cherry to deep burgundy.
- Use a gold striping tape for accents.
Color Psychology: Red is associated with confidence, passion, and energy. Perfect for a power manicure!
To make your red swirls even more captivating:
- Incorporate a metallic red for extra dimension
- Add tiny heart designs for a romantic touch
- Use a matte top coat on some nails for textural contrast
Neon Nights: Electric Nail Designs
Light up the night with these vibrant electric nail designs.
- Start with a white base for maximum color pop.
- Use neon polishes to create bold swirls.
- Add dots of contrasting neons for extra zing.
- Seal with a UV-reactive top coat for glow-in-the-dark fun.
Safety First: If using UV-reactive polishes, remember to apply sunscreen to your hands before exposure to UV light.
To make your neon design truly electrifying:
- Use black light reactive polish for an extra glow
- Incorporate geometric shapes for a modern edge
- Add a matte top coat to some nails for interesting texture contrast
Spooky Spirals: Halloween Nail Designs
Get into the Halloween spirit with these bewitching Halloween nail designs.
- Use a black base for that spooky vibe.
- Add swirls of orange, purple, and green.
- Incorporate tiny Halloween motifs like ghosts or pumpkins.
- Finish with a glow-in-the-dark top coat for extra eeriness.
Seasonal Tip: These designs work great for fall-themed events too!
To make your Halloween nails even more boo-tiful:
- Use crackle polish for a cobweb effect
- Add tiny bat or witch hat decals
- Incorporate a gradient effect with Halloween colors
You might like : 18+ Hues Nail Color for Purple Dress

Ooh La La: French Accented Swirls
Give the classic French manicure a twist with these chic swirled accents.
- Apply a sheer pink base.
- Create a traditional French tip in white.
- Add colored swirls along the tip or diagonally across the nail.
- Seal with a high-shine top coat.
Variation: Try an ombré French tip as your base for an extra modern look.
To elevate your French swirl design:
- Use metallic polish for the swirls
- Add tiny pearls or rhinestones along the swirl
- Incorporate negative space elements in the French tip
Opposites Attract: Matte and Gloss Contrast
Play with textures to create visually interesting nails.
- Apply your base color.
- Create swirls using a contrasting color.
- Apply a matte top coat to half the nail and a glossy top coat to the other half.
Pro Tip: Use striping tape to create a clean line between matte and glossy sections.
To enhance the contrast in your design:
- Use complementary colors for maximum impact
- Add metallic accents to the glossy sections
- Create a gradient effect within the swirls
Fade to Fab: Cool Ombré Swirl Techniques
Master the art of the gradient with these ombré swirls.
- Choose 2-3 colors in the same family.
- Apply the lightest shade as your base.
- Use a makeup sponge to dab on the darker shades, blending as you go.
- Create swirls using the darkest shade while the gradient is still wet.
Tool Tip: Cut a small wedge out of your makeup sponge for easier application on curved nail surfaces.
To perfect your ombré swirl:
- Practice blending on a piece of paper first
- Use a fan brush for a softer gradient effect
- Add glitter to the darkest shade for extra dimension

Less is More: Minimalist Swirl Designs
Sometimes, simplicity is key. These minimalist designs prove that less can indeed be more.
- Start with a nude or clear base.
- Use a thin brush to create a single, elegant swirl on each nail.
- Add a tiny dot of contrasting color at the end of each swirl.
Simplicity is the ultimate sophistication.” – Leonardo da Vinci
To elevate your minimalist swirl:
- Use metallic polish for a subtle shimmer
- Incorporate negative space elements
- Add a single rhinestone for a touch of glamour
Citrus Splash: Chartreuse and Beyond
Embrace bold, unexpected colors with these zesty designs.
- Use a white base for maximum color pop.
- Create swirls using chartreuse, lime green, and lemon yellow.
- Add tiny white dots for a fresh, citrusy feel.
Color Psychology: Chartreuse is associated with energy, growth, and harmony.
To make your citrus design even juicier:
- Add a matte top coat for a modern twist
- Incorporate fruit slice designs (lemon, lime, orange)
- Use neon shades for an extra vibrant look
Green with Envy: Earth-Inspired Minimalism
Bring a touch of nature to your nails with these earthy designs.
- Choose a palette of greens, from sage to emerald.
- Create subtle swirls using different shades.
- Add gold leaf accents for a touch of luxury.
Inspiration: Look to leaves, vines, and ferns for natural swirl patterns.
To enhance your earth-inspired design:
- Use a dry brush technique for a watercolor effect
- Add tiny leaf or branch designs
- Incorporate a matte finish for a natural look
Explore this interesting post : 14 Amazing Nails Colors Guide for Burgundy Dress

Trip the Light Fantastic: Psychedelic Swirls
Take a journey back to the 60s with these mind-bending designs.
- Start with a white base.
- Create swirls using bold, contrasting colors like orange, purple, and green.
- Add black outlines to make the colors pop.
- Seal with a high-shine top coat for that lava lamp effect.
Historical Note: Psychedelic art gained popularity in the mid-1960s, influenced by the hippie movement and hallucinogenic drugs.
To make your psychedelic design even groovier:
- Use neon colors for extra vibrancy
- Add tiny peace sign or flower designs
- Incorporate glow-in-the-dark polish for a trippy effect
Maintenance and Longevity
You’ve created your perfect swirl design, now let’s make it last!
Top Coat Techniques for Lasting Designs
- Apply a thin layer of top coat daily to prevent chipping.
- Use a quick-dry top coat for added protection.
- Avoid hot water for the first few hours after application.
- Reapply top coat every 2-3 days to maintain shine and durability.
- Consider using a gel top coat for extended wear (if using gel polishes).
Touch-up Tricks for On-the-Go Fixes
- Carry a small bottle of clear polish for quick repairs.
- Use a nail art pen for easy touch-ups of detailed designs.
- Keep a nail file handy to smooth out any rough edges.
- Bring small nail polish remover pads for emergencies.
- Pack a tiny brush for precise touch-ups of swirl designs.
DIY vs. Salon: Pros and Cons
| DIY | Salon |
| ✅ Cost-effective | ✅ Professional finish |
| ✅ Can experiment freely | ✅ Access to high-quality tools |
| ✅ Flexibility in timing | ✅ Expert advice and techniques |
| ✅ Opportunity to improve skills | ✅ Relaxing experience |
| ❌ Requires practice | ❌ Can be expensive |
| ❌ Time-consuming | ❌ Less personal creative control |
| ❌ Limited to own skill level | ❌ Potential exposure to harmful chemicals |
| ❌ Need to invest in supplies | ❌ Time constraints for appointments |
Learn more about how to do Swirl Nail Art in this video :
Conclusion
- From celestial shimmers to earthy minimalism, swirl nail designs offer endless possibilities for self-expression. Whether you’re a nail art novice or a seasoned pro, there’s a swirl design out there waiting to adorn your fingertips. Remember, practice makes perfect, so don’t be afraid to experiment and find your signature swirl!
- Now it’s your turn to dive into the world of swirls. Which design will you try first? Share your creations and inspire others in the nail art community. After all, the best nail art is the one that makes you feel confident and fabulous!
Final Thought: Your nails are a canvas, and swirls are your paintbrush. Let your creativity flow and watch as your hands become works of art!

Sarah Williams is an experienced blogger and fashion enthusiast at Glammer Galaxy. With a passion for beauty and style, she shares expert insights on hair trends, nail art, and fashion tips. Her creative flair and years of experience make her a go-to source for all things glam!

