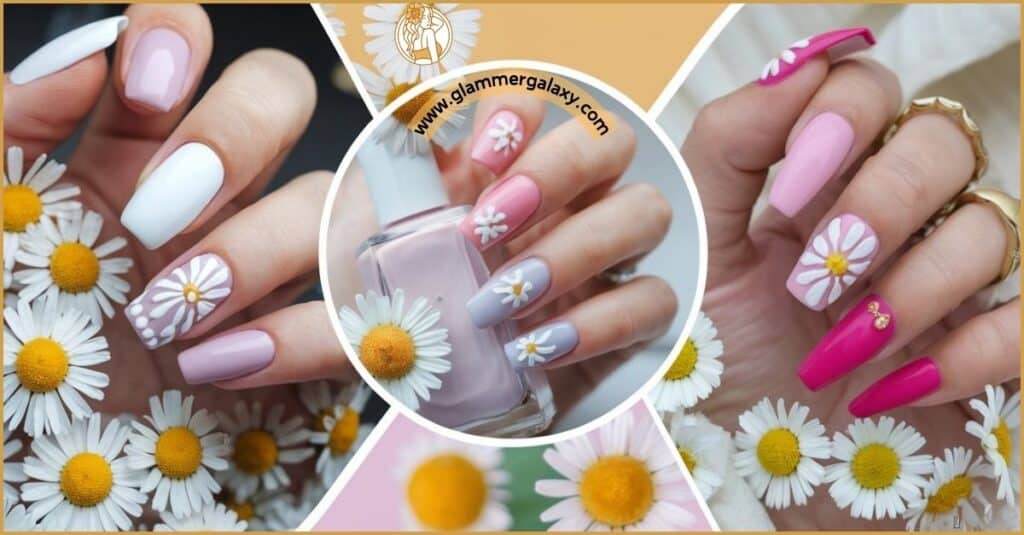
In the ever-evolving world of nail art, daisy nail designs have blossomed into a timeless trend that continues to captivate nail enthusiasts. These charming floral motifs offer a perfect blend of simplicity and elegance, making them a go-to choice for those seeking a fresh and vibrant look.
In this guide, we’ll explore 25 stunning daisy nail designs that will inspire you to embrace the beauty of nature at your fingertips.
Classic Daisy Designs with a Twist
Classic daisy designs never go out of style, but adding a unique twist can elevate your manicure to new heights. Here are five fresh takes on the traditional daisy nail art:
Minimalist White Daisies on a Clear Base
For a clean and sophisticated look, try painting delicate white daisies on a clear base. This design allows your natural nail to shine through, creating an ethereal effect that’s perfect for any occasion.
Pro Tip: Use a thin brush to create precise petals and a dotting tool for the center of each daisy.
Negative Space Daisy Nails
Negative space designs are all the rage, and daisies lend themselves beautifully to this trend. Create daisy outlines using a contrasting color against your natural nail for a modern and chic appearance.
French Daisy Nail
Give the classic French manicure a floral upgrade by incorporating daisies into the tip design. This elegant twist on a timeless style is perfect for weddings or formal events.
French Daisy Nail Ideas:
- White daisies on a nude base with white tips
- Colorful daisies on a clear base with matching colored tips
- Reversed French with daisy accents on the half-moon
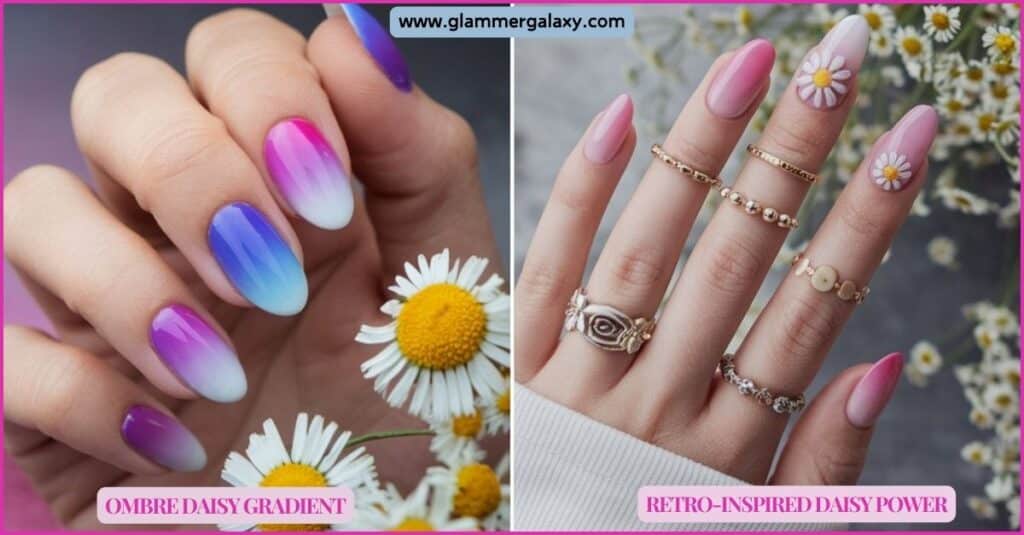
Ombre Daisy Gradient
Combine the softness of an ombre gradient with delicate daisy designs for a dreamy, romantic look. Start with a light base color and gradually blend it into a darker shade, then add daisies in white or a contrasting hue.
Retro-Inspired Daisy Power
Channel the groovy vibes of the ’60s and ’70s with bold, retro-inspired daisy designs. Think oversized flowers, psychedelic color combinations, and funky patterns.
Retro Daisy Color Combos:
- Orange and yellow
- Pink and green
- Purple and turquoise
Have You Read This Yet?: 17 Dark Green Nail Designs to Elevate Your Style
Colorful Daisy Delights
Who says daisies have to be white? Embrace the rainbow with these vibrant daisy nail designs that are sure to turn heads.
Sunset-Hued Daisies
Capture the warmth of a summer sunset with daisies in shades of orange, pink, and yellow. This design is perfect for beach vacations or adding a pop of color to your everyday look.
Neon Daisy Pop
Make a bold statement with neon daisy designs that practically glow. Pair electric yellows, pinks, and greens with a black or white base for maximum impact.
Pastel Daisy Dreams
For a softer approach, opt for pastel-colored daisies. These delicate hues create a dreamy, romantic atmosphere that’s perfect for spring and summer.
Popular Pastel Combinations:
- Lavender and mint
- Peach and baby blue
- Pale yellow and light pink
Monochromatic Daisy Magic
Create a sophisticated look by using various shades of a single color for your daisy design. This technique adds depth and dimension to your nails while maintaining a cohesive appearance.
Rainbow Daisy Wonderland
Why choose one color when you can have them all? Paint each nail a different color and top them with white daisies, or create a rainbow gradient across all your nails with multicolored daisy accents.
Avant-Garde Daisy Designs
Push the boundaries of traditional nail art with these innovative and artistic daisy-inspired designs.
Geometric Daisy Patterns
Combine the organic shape of daisies with sharp geometric patterns for a modern, edgy look. Use striping tape to create clean lines and incorporate daisy elements within the geometric shapes.
Watercolor Daisy Illusions
Create a soft, dreamy effect by using watercolor techniques to paint your daisies. This design gives the impression of delicate petals floating on your nails.
Watercolor Nail Art Technique:
- Apply a white base coat
- Use a small brush to add diluted nail polish in your chosen colors
- Blend the colors gently while still wet
- Once dry, add daisy details with a fine brush
Metallic Daisy Accents
Add a touch of glamour to your daisy nails with metallic accents. Use gold or silver foil to outline your daisies or create shimmering centers for a luxurious finish.
Holographic Daisy Shimmer
Combine the trend of holographic nails with daisy designs for a truly eye-catching look. Paint daisies using holographic polish or add holographic accents to traditional daisy designs.
Textured 3D Daisy Creations
Take your daisy nails to the next level with 3D elements. Use acrylic or gel to sculpt raised petals and centers, creating a tactile and visually stunning design.
Seasonal Daisy Inspirations
Adapting your daisy nail designs to suit every season allows you to keep this charming floral motif fresh and relevant throughout the year. By drawing inspiration from nature’s ever-changing palette, you can create nail art that perfectly captures the essence of each season. Let’s explore how to transform your daisy nails as the seasons shift, incorporating elements that reflect the unique beauty of spring, summer, autumn, and winter.
Spring Awakening: Delicate Daisy Buds
As winter thaws and new life begins to emerge, celebrate the arrival of spring with nail art featuring delicate daisy buds and small blooms. This design captures the gentle awakening of nature and the promise of warmer days to come.
Key Elements:
- Incorporate soft greens reminiscent of new leaves and fresh grass
- Use pastel shades like baby pink, lavender, and pale yellow to represent the first flowers of the season
- Paint tiny daisy buds with closed or partially opened petals to symbolize growth and renewal
- Add delicate stems and leaves to create a cohesive, nature-inspired look
Technique Tip: Use a fine-tipped brush to create thin, wispy stems and small, rounded buds. Layer lighter shades over darker ones to create depth and dimension in your floral designs.
Summer Bloom: Vibrant Daisy Fields
As the days grow longer and warmer, capture the essence of a sun-drenched summer meadow with bold, fully bloomed daisies in bright, cheerful colors. This design brings to mind lazy days spent in flower-filled fields under clear blue skies.
Key Elements:
- Opt for vibrant, saturated colors like sunshine yellow, sky blue, and grass green
- Paint large, fully opened daisies with defined petals and prominent centers
- Incorporate small insects like ladybugs, bees, or butterflies for a whimsical touch
- Use a bright blue or green background to represent clear summer skies or lush grass
Creative Idea: Try creating a gradient effect across your nails, transitioning from a grassy green at the base to a sky blue at the tips, with daisies scattered throughout for a truly immersive meadow effect.
Autumn Whisper: Muted Daisy Tones
As the days grow shorter and leaves begin to change, transition your daisy nails into fall with warm, muted tones that reflect the cozy atmosphere of the season. This design captures the subtle beauty of autumn’s fading blooms and changing landscape.
Key Elements:
- Use warm, earthy tones such as rusty orange, deep red, and golden yellow
- Pair these autumn hues with muted greens to represent the changing foliage
- Paint daisies with slightly curled or wilting petals to symbolize the end of the growing season
- Incorporate autumn leaves or other fall motifs alongside your daisy designs
Texture Tip: Experiment with matte top coats to give your autumn daisy nails a soft, velvety finish that mimics the texture of fall leaves.
Winter Frost: Icy Daisy Crystals
As temperatures drop and landscapes are blanketed in snow, give your daisy nails a frosty makeover that captures the magical beauty of winter. This design transforms delicate daisies into crystalline works of art.
Key Elements:
- Use icy blue and pure white shades as your primary colors
- Add silver or iridescent accents to mimic the sparkle of frost and snow
- Paint daisies with sharp, crystalline petals rather than soft, rounded ones
- Incorporate snowflake patterns or geometric crystal shapes alongside your daisy designs
Embellishment Idea: Apply small clear or iridescent crystals to your nails to create a 3D effect that truly captures the icy brilliance of a winter landscape. Place these strategically at the center of daisies or scattered across the nail to resemble falling snow.
Year-Round Daisy: Adapting the Design for Any Season
While each season offers unique inspiration for your daisy nail art, there are ways to adapt this versatile design to suit any time of year. By adjusting colors, adding seasonal elements, and playing with different techniques, you can create daisy nails that always feel fresh and appropriate.
Tips for Seasonal Adaptation:
- Spring: Focus on pastels and new growth themes
- Summer: Embrace bold colors and full blooms
- Autumn: Incorporate warm tones and seasonal motifs like falling leaves
- Winter: Experiment with cool tones and crystalline effects
Remember, the key to creating stunning seasonal daisy nail art is to observe and draw inspiration from the natural world around you. Pay attention to the changing colors, textures, and atmospheres as the year progresses, and let these elements inform your nail designs. With a little creativity and attention to detail, your daisy nails can beautifully reflect the ever-changing seasons, keeping your manicure fresh and exciting all year round.
Year-Round Daisy: Adapting the Design for Any Season
Learn how to modify your daisy nail art to suit any time of year with these simple tips:
| Season | Color Palette | Additional Elements |
| Spring | Pastels, light greens | Raindrops, butterflies |
| Summer | Bright, vibrant hues | Sun, beach elements |
| Autumn | Warm, earthy tones | Falling leaves, pumpkins |
| Winter | Cool blues, whites | Snowflakes, glitter |
Other Post You Might Love: 20+ Nail Colors with Blue Dress: Top Picks!
Daisy Nail Art Techniques
Master the art of creating perfect daisy nails with these essential techniques and tips.
Freehand Painting Tips
Painting daisies freehand requires practice, but with these tips, you’ll be creating beautiful designs in no time:
- Start with the center: Use a dotting tool to create a perfect circle
- Paint the petals: Use a thin brush and work in a circular motion around the center
- Add details: Once the base is dry, add highlights or outlines to give depth to your daisies
Stamping Secrets for Perfect Petals
Nail stamping is an excellent technique for achieving consistent, precise daisy designs:
- Choose a daisy-themed stamping plate
- Apply stamping polish to the design
- Scrape excess polish off the plate
- Pick up the design with a stamper
- Roll the stamper onto your nail to transfer the design
Dotting Tool Tricks for Daisy Centers
A dotting tool is essential for creating perfect daisy centers. Here’s how to use it effectively:
- Use different sizes of dotting tools to create varied center sizes
- Double-dip your dotting tool in two colors for a more realistic center
- Create texture by gently tapping the center with the dotting tool after applying the initial dot
Nail Stickers and Decals for Quick Daisy Designs
For those short on time or new to nail art, stickers and decals offer a quick and easy way to achieve beautiful daisy nails:
- Apply a base coat and let it dry completely
- Carefully place the sticker or decal on your nail
- Smooth out any bubbles or wrinkles
- Apply a top coat to seal and protect the design
Airbrush Techniques for Ethereal Daisy Effects
Airbrushing can create soft, dreamy daisy designs with a professional finish:
- Use stencils to create daisy shapes on your nails
- Airbrush your chosen colors over the stencils
- Carefully remove the stencils to reveal your daisy design
- Add details with a fine brush if desired
DIY Daisy Nail Tutorial
Ready to create your own stunning daisy nails at home? Follow this step-by-step guide to achieve professional-looking results.
Essential Tools and Products
Gather these items before you begin:
- Base coat
- White nail polish
- Color nail polish of your choice
- Top coat
- Thin nail art brush
- Dotting tool
- Nail art tape (optional)
- Nail polish remover and cotton swabs for cleanup
Step-by-Step Guide for Beginners
- Apply a base coat and let it dry completely
- Paint your nails with your chosen background color
- Using a dotting tool, create small circles for the daisy centers
- With a thin brush, paint white petals around each center
- Add any additional details or embellishments
- Seal your design with a top coat
Advanced Techniques for Nail Art Enthusiasts
Once you’ve mastered the basics, try these advanced techniques:
- Layering: Create depth by layering different sizes and colors of daisies
- Negative space: Incorporate clear areas into your design for a modern look
- Mixed media: Combine painting with studs, glitter, or 3D elements
Troubleshooting Common Daisy Design Issues
| Issue | Solution |
| Smudged petals | Wait for each layer to dry completely before adding details |
| Uneven petals | Practice consistency in petal size and shape; use a stencil if needed |
| Bleeding colors | Ensure your base color is completely dry before adding designs |
| Chipping design | Apply a generous layer of top coat and reapply every few days |
Longevity Tips: Making Your Daisy Nails Last
To keep your daisy nails looking fresh for longer:
- Always use a quality base and top coat
- Avoid excessive exposure to water
- Wear gloves when doing household chores
- Touch up your top coat every 2-3 days
- Be gentle with your nails to prevent chipping
Daisy Nails for Every Occasion
Daisy nail designs are versatile enough to suit any event or setting. Here’s how to adapt your daisy nails for different occasions:
Wedding-Worthy Daisy Manicures
For brides or wedding guests, opt for elegant daisy designs:
- French manicure with delicate daisy accents
- Pale pink base with white daisies and pearl centers
- Clear base with scattered daisy petals for a confetti-like effect
Office-Appropriate Daisy Subtlety
Keep it professional with subtle daisy designs suitable for the workplace:
- Nude base with a single daisy accent nail
- Navy blue base with white daisy outlines
- Matte finish daisy pattern in neutral tones
Festival-Ready Bold Daisy Statements
For music festivals or summer parties, go all out with vibrant daisy designs:
- Neon daisies on a black base
- Rainbow daisy gradient across all nails
- Daisy designs with glow-in-the-dark accents
Date Night Daisy Elegance
Create a romantic atmosphere with these date-night daisy ideas:
- Deep red base with gold-centered white daisies
- Sheer pink base with scattered mini daisies
- Ombre effect with daisies gradually appearing from cuticle to tip
Everyday Daisy Chic
For a daily dose of flower power, try these wearable daisy designs:
- Alternating solid color and daisy accent nails
- Tiny daisies on a neutral base
- Daisy French tips on short, natural nails
Caring for Your Daisy Nail Art
Proper care is essential to maintain the beauty of your daisy nail designs. Follow these tips to keep your nails looking fresh and vibrant.
Gentle Cleaning Methods
Clean your nails carefully to avoid damaging the design:
- Use a soft brush to gently remove dirt or debris
- Avoid harsh soaps or acetone-based products
- Pat dry instead of rubbing when using a towel
Touch-Up Techniques
Keep your daisy nails looking fresh with these touch-up tips:
- Carry a small brush and your nail polish colors for on-the-go fixes
- Use a thin brush to carefully repaint any chipped areas
- Apply a fresh top coat every few days to maintain shine and protection
Proper Removal Without Damage
When it’s time to change your design, remove your daisy nails safely:
- Soak a cotton pad in acetone-free nail polish remover
- Place the pad on your nail and wrap with aluminum foil
- Leave for 5-10 minutes, then gently rub off the design
- Moisturize your nails and cuticles after removal
Nail Health Maintenance Between Designs
Keep your nails healthy between daisy designs:
- Give your nails a break from polish occasionally
- Use a nourishing cuticle oil daily
- File nails gently in one direction to prevent splitting
- Eat a balanced diet rich in biotin and vitamins for strong nails
When to Seek Professional Help
While DIY nail art is fun, sometimes it’s best to visit a professional:
- If you experience any allergic reactions or irritation
- For complex 3D designs or airbrushing techniques
- When you want long-lasting gel or acrylic daisy nails
- If you notice any signs of nail damage or infection
Discover More Here: Can I Paint on Top of Acrylic Nails? A Guide to Nail Art
Daisy Nail Inspiration from Around the World
Discover how different cultures interpret daisy nail designs and incorporate unique elements into your own creations.
Japanese Cherry Blossom-Inspired Daisies
Combine the delicacy of cherry blossoms with daisy shapes:
- Pale pink base with white daisy-shaped cherry blossoms
- Add small branches and buds for an authentic look
- Incorporate gold leaf accents for a touch of luxury
Scandinavian Minimalist Daisy Designs
Embrace Nordic simplicity with clean, minimalist daisy nails:
- White daisies on a light gray or beige base
- Single line art daisies on a nude background
- Geometric daisy patterns in black and white
Tropical Island Daisy Vibes
Infuse your daisy nails with the colors of paradise:
- Bright blue base with white daisies and yellow centers
- Add small palm tree or wave designs alongside daisies
- Use a gradient of tropical sunset colors as a background for white daisies
Bohemian Wildflower Daisy Mix
Create a free-spirited look with a mix of daisies and wildflowers:
- Combine daisies with small forget-me-nots and lavender sprigs
- Use earthy, muted tones for a natural bohemian vibe
- Add pressed dried flowers for authentic texture
New York Chic Monochrome Daisies
Channel big city sophistication with sleek, monochromatic daisy designs:
- Black and white daisy patterns for a classic look
- Gray scale ombre with daisy accents
- Metallic silver daisies on a matte black base
Watch this Daisy Nail Art Tutorial Video to Boast Your Creativity
Conclusion
Daisy nail designs offer a wonderful blend of simplicity and charm, making them a perfect choice for nail art enthusiasts of all levels. From classic white daisies to bold, avant-garde interpretations, there’s a daisy design to suit every style and occasion.
Whether you’re looking for a subtle office-appropriate design or a bold festival-ready look, daisy nails can be adapted to fit your needs. So grab your nail art tools and let your creativity bloom with these delightful daisy designs!
FAQs
Q: Can daisy nails be done on short nails?
A: Absolutely! Daisy designs can be adapted for any nail length. For short nails, try smaller daisies or focus on accent nails with daisy designs.
Q: How long does a typical daisy nail design last?
A: With proper care and a good top coat, your daisy nail design can last up to 7-10 days. Touch-ups and regular top coat application can extend the life of your manicure.
Q: Can daisy nails be combined with other nail art trends?
A: Definitely! Daisy designs pair well with many trends like ombre, negative space, or glitter accents. Get creative and mix and match to create unique combinations.

Sarah Williams is an experienced blogger and fashion enthusiast at Glammer Galaxy. With a passion for beauty and style, she shares expert insights on hair trends, nail art, and fashion tips. Her creative flair and years of experience make her a go-to source for all things glam!

