In the ever-evolving world of nail fashion, butterfly nail art has emerged as a captivating trend that’s taking the beauty world by storm. These delicate, winged creatures have long symbolized transformation and beauty, making them the perfect muse for your next manicure.
In this comprehensive guide, we’ll explore 17 stunning butterfly nail art designs that will transform your fingertips into miniature works of art.
The Beauty of Butterfly Nail Art
Butterflies have long captivated human imagination with their delicate beauty and symbolic significance. These winged wonders have fluttered their way into various trends, from clothing prints to accessories.
Now, they’ve alighted on the world of nail art, bringing with them a fresh burst of creativity and charm.
Why Butterfly Nail Designs are Trending
The surge in popularity of butterfly nail designs can be attributed to several factors:
- Versatility: Butterfly motifs can be adapted to suit any style, from minimalist to extravagant.
- Symbolism: Butterflies represent transformation and growth, resonating with many people on a personal level.
- Seasonality: While perfect for spring and summer, butterfly designs can be tweaked to suit any season.
- Social Media Impact: The visual appeal of butterfly nails makes them highly shareable on platforms like Instagram and Pinterest.
“Butterfly nail art allows for endless creativity. It’s a trend that can be as subtle or as bold as the wearer desires,” says celebrity nail artist, Mei Kawajiri.
Understanding Butterfly Nail Art
Before we dive into the specific designs, let’s take a moment to understand what exactly constitutes butterfly nail art and how this trend has evolved.
Defining Butterfly Nail Art
Butterfly nail art encompasses any nail design that incorporates butterfly elements. This can range from realistic depictions of butterflies to abstract interpretations of their wings or patterns. The designs can be created using various techniques, including:
- Freehand painting
- Stenciling
- Decals and stickers
- 3D embellishments
Evolution of the Trend
The butterfly nail art trend has undergone significant evolution since its inception:
| Era | Trend Characteristics |
| Early 2000s | Simple, single-color butterfly stickers |
| 2010s | More intricate hand-painted designs |
| 2020s | Advanced techniques, 3D elements, and abstract interpretations |
Popularity Across Different Age Groups and Styles
One of the most appealing aspects of butterfly nail art is its ability to transcend age and style barriers. Here’s a breakdown of how different demographics are embracing this trend:
- Teens and Young Adults: Bold, colorful designs with glitter and 3D elements
- Working Professionals: Subtle, minimalist butterfly accents
- Mature Adults: Elegant, classic interpretations with muted colors
- Nail Art Enthusiasts: Experimental designs pushing the boundaries of creativity
See Also : 40 Stunning Nude Nail Designs to Elevate Your Look
Preparing for Your Butterfly Nail Masterpiece
Creating stunning butterfly nail art requires more than just creativity; it demands the right tools, products, and preparation. Let’s explore what you’ll need to get started on your butterfly nail journey.
Essential Tools and Products
To create professional-looking butterfly nail art, you’ll need to stock up on some key items:
- Nail Prep Essentials
- Nail file and buffer
- Cuticle pusher and remover
- Base coat
- Top coat
- Color Selection Guide
- Base colors (pastels, neons, neutrals)
- Accent colors for butterfly details
- Metallic polishes for highlights
- Specialized Brushes and Dotting Tools
- Fine-tip nail art brushes
- Dotting tools in various sizes
- Fan brushes for blending
- Stencils, Decals, and Stickers
- Butterfly-shaped nail stencils
- Water-slide decals
- 3D butterfly charms
Nail Health Considerations
Before diving into elaborate nail art, it’s crucial to ensure your nails are healthy and well-prepared:
- Moisturize: Keep your cuticles and surrounding skin hydrated
- Strengthen: Use a nail strengthening treatment if your nails are prone to breakage
- Clean: Ensure nails are free from oils and residue before applying polish
Choosing the Right Nail Shape for Butterfly Designs
The shape of your nails can significantly impact the overall look of your butterfly design:
- Oval: Ideal for classic, symmetrical butterfly designs
- Square: Perfect for geometric, abstract butterfly patterns
- Stiletto: Great for elongated, dramatic butterfly wing effects
- Coffin: Offers a large canvas for intricate butterfly scenes
Step-by-Step Guide to DIY Butterfly Nail Art
Creating beautiful butterfly nail art at home is an exciting way to express your creativity and add a touch of whimsy to your manicure. This comprehensive guide will walk you through each stage of the process, from preparation to the final touches, ensuring your nails become a canvas for delicate winged wonders.
Prepping Your Nails
A flawless nail art design begins with proper preparation. Follow these essential steps to create the perfect foundation:
- Clean: Start with a blank canvas by thoroughly removing any existing polish using a gentle, acetone-free remover. Wash your hands with soap and warm water to eliminate any residue or oils that might interfere with polish adhesion.
- Shape: Using a quality nail file, carefully shape your nails to your desired form. Whether you prefer square, round, or almond-shaped nails, consistency across all fingers is key for a polished look.
- Buff: Gently buff the surface of each nail using a fine-grit buffer. This step smooths out any ridges or imperfections, creating an even base for your polish application.
- Cuticle Care: Proper cuticle maintenance is crucial for a professional-looking manicure. Carefully push back your cuticles using a wooden or rubber pusher. Apply a nourishing cuticle oil to keep the area hydrated and healthy.
Creating the Perfect Base
A smooth, even base is essential for showcasing your butterfly designs:
- Apply a thin layer of base coat to each nail. This step protects your natural nails from staining and helps the color polish adhere better.
- Select your base color carefully, considering how it will complement your butterfly design. Apply 2-3 thin coats of polish, allowing each layer to dry completely before adding the next. Thin layers prevent bubbling and ensure faster drying times.
- Patience is key: Allow ample time for each layer to dry thoroughly. Using a quick-dry top coat between layers can speed up the process while adding shine.
Have You Read This Yet?: 25 Stunning Daisy Nail Designs for a Fresh Look
Techniques for Applying Butterfly Designs
Explore these three methods to bring your butterfly nail art to life:
- Freehand Painting
- Ideal for those with steady hands and artistic flair
- Use a fine-tip brush or nail art pen to carefully outline the butterfly shape
- Fill in the design with your chosen colors, building up layers for depth and vibrancy
- Add intricate details such as antennae, body segments, and wing patterns
- Practice on paper first to perfect your technique
- Stencil Application
- Perfect for achieving precise, uniform designs
- Wait until your base color is almost dry but still slightly tacky
- Carefully place the butterfly stencil on your nail, ensuring it lies flat
- Use a small makeup sponge to dab polish over the stencil, building up color gradually
- Gently remove the stencil while the polish is still wet to reveal crisp lines
- Clean up any edges with a small brush dipped in nail polish remover
- Decal and Sticker Placement
- Ideal for beginners or those short on time
- Apply a thin layer of top coat where you plan to place the decal or sticker
- While the top coat is still wet, carefully slide the decal onto your nail using tweezers
- Press gently to remove any air bubbles and ensure good adhesion
- Trim any excess decal hanging over the nail edge with small scissors
- Seal the design with another layer of top coat for longevity
Sealing and Protecting Your Design
The final steps are crucial for preserving your butterfly nail art:
- Allow your completed design to dry completely. This may take 15-30 minutes, depending on the complexity of your artwork.
- Apply a generous layer of top coat, ensuring you cover the entire nail and “seal” the edges of your design. This step adds shine and protects your art from chipping.
- For extra durability, consider using a UV gel top coat. This requires curing under a UV or LED lamp but can extend the life of your manicure significantly.
- To maintain your butterfly nail art, apply a thin layer of top coat every 2-3 days and avoid using your nails as tools.
With these detailed steps and techniques, you’re well-equipped to create stunning butterfly nail art at home. Remember, practice makes perfect, so don’t be discouraged if your first attempts aren’t flawless. Soon, you’ll be sporting beautiful, eye-catching butterfly designs that are sure to garner compliments and showcase your creativity.
17 Stunning Butterfly Nail Art Designs
Now, let’s explore the 17 breathtaking butterfly nail art designs that will elevate your manicure game to new heights.
1. Ethereal Pastel Butterfly Wings
Embrace the soft, feminine look with pastel butterfly nails. This design features delicate wings in soft hues of pink, lavender, and mint.
Key Features:
- Gentle nail art perfect for spring
- Subtle shading for a 3D effect
- Thin black outlines for definition
2. Vibrant Neon Monarch Butterflies
Make a bold statement with neon butterfly nail designs inspired by the iconic Monarch butterfly.
Key Features:
- Bright orange base with black patterns
- Fluorescent accents for an eye-catching look
- Perfect for summer nail trends
3. Glitter-Dusted Butterfly Silhouettes
Add a touch of glamour with glittery butterfly nails that shimmer and shine.
Key Features:
- Transparent base with glitter overlay
- Butterfly shapes created with negative space
- Ideal for special occasion nails
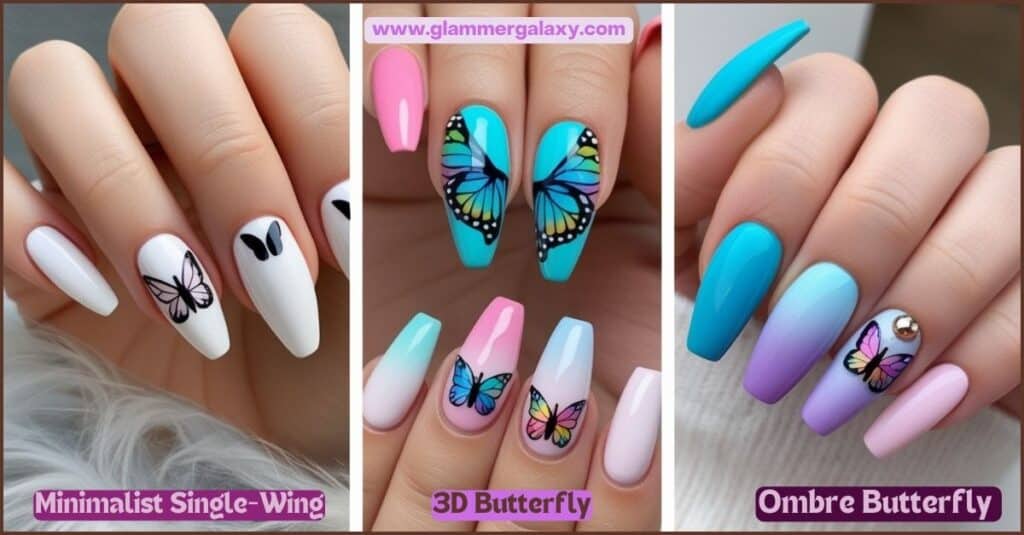
4. Minimalist Single-Wing Accent Nails
For those who prefer subtle elegance, try this minimalist butterfly nail design.
Key Features:
- Single butterfly wing on accent nail
- Clean lines and simple color palette
- Perfect for office-appropriate nail art
5. 3D Butterfly Embellishments
Take your nail art to new dimensions with raised butterfly designs.
Key Features:
- Acrylic or gel sculpted butterflies
- Textured finish for a unique look
- Can be combined with other nail art techniques
6. Ombre Butterfly Gradient Effect
Blend colors seamlessly with this ombre butterfly nail design.
Key Features:
- Gradient effect on each nail
- Butterfly silhouettes over the ombre background
- Stylish nail trend that’s easy to customize
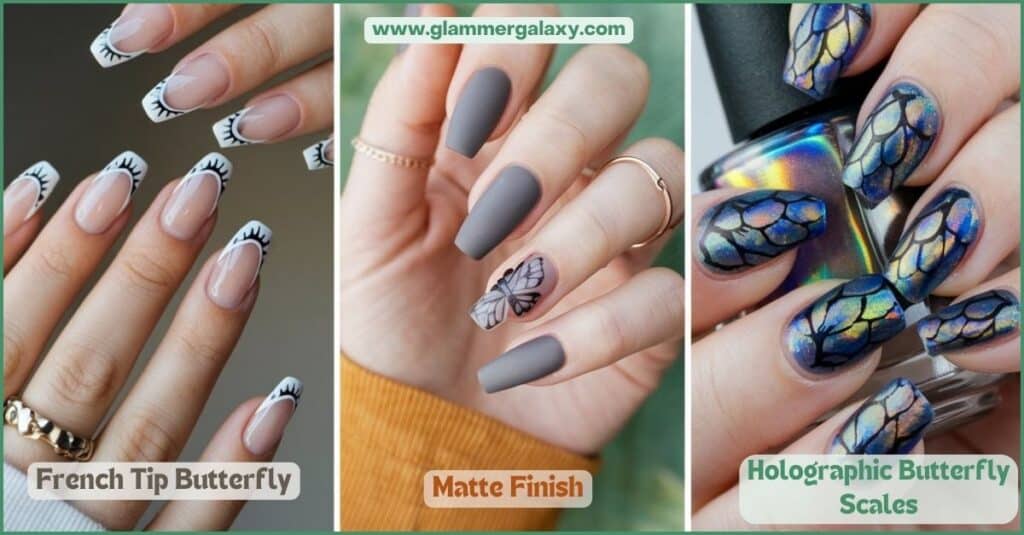
7. French Tip Butterfly Accents
Give the classic French manicure a whimsical twist with butterfly accents.
Key Features:
- Traditional French tip base
- Delicate butterflies along the tip line
- Elegant nails with a modern touch
8. Matte Finish Butterfly Outlines
For a chic and modern look, try matte butterfly nails.
Key Features:
- Velvet-like matte top coat
- Butterfly outlines in contrasting colors
- Sophisticated and understated design
9. Holographic Butterfly Scales
Capture the iridescent beauty of butterfly wings with holographic nail art.
Key Features:
- Holographic polish or powder for a dazzling effect
- Scale-like patterns to mimic real butterfly wings
- Eye-catching look that changes with the light
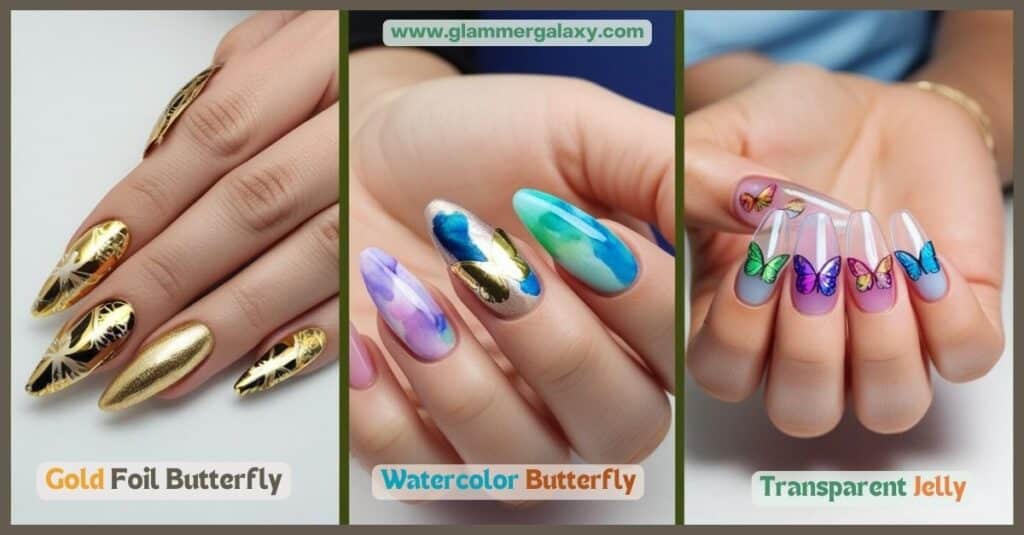
10. Gold Foil Butterfly Patterns
Add a touch of luxury with gold foil butterfly nail designs.
Key Features:
- Gold foil accents on a neutral base
- Butterfly shapes created with foil
- Elegant nails perfect for special occasions
11. Watercolor Butterfly Washes
Embrace your artistic side with watercolor butterfly nails.
Key Features:
- Soft, blended colors reminiscent of watercolor paintings
- Dreamy, abstract butterfly shapes
- Perfect for those who love creative nail art
12. Transparent Jelly Butterfly Nails
Create depth and dimension with transparent jelly nails featuring butterfly designs.
Key Features:
- Clear or tinted jelly polish base
- Layered butterfly designs for a 3D effect
- Modern twist on traditional butterfly nail art
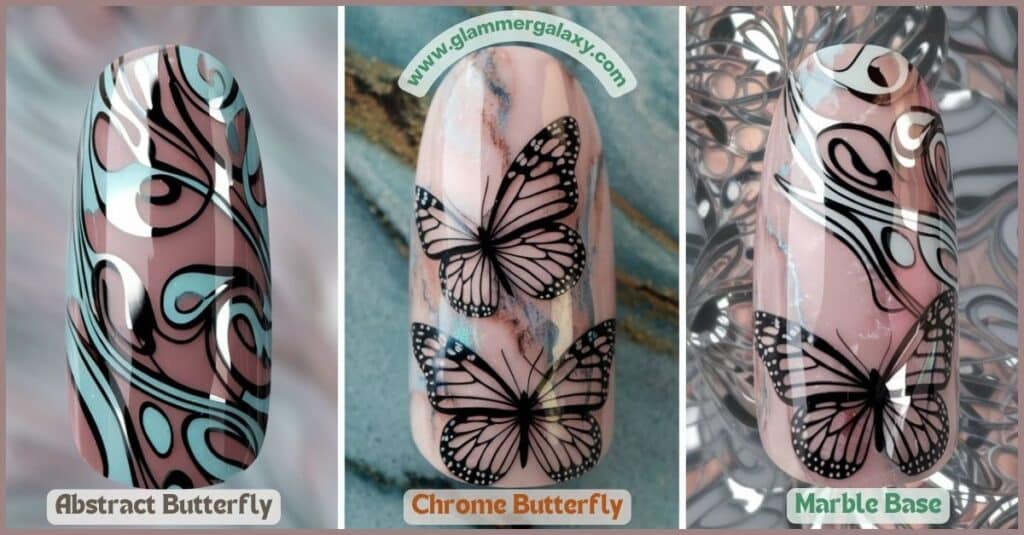
13. Abstract Butterfly-Inspired Swirls
For a more avant-garde approach, try abstract butterfly-inspired nail art.
Key Features:
- Swirling patterns reminiscent of butterfly wings
- Bold color combinations
- Unique interpretation of the butterfly trend
14. Chrome Butterfly Wing Reflections
Capture the metallic sheen of butterfly wings with chrome nail art.
Key Features:
- Chrome powder over a dark base
- Butterfly wing patterns created with negative space
- Futuristic take on butterfly nail designs
15. Marble Base with Butterfly Overlays
Combine two popular nail trends with marble and butterfly designs.
Key Features:
- Marbled nail art as the base
- Delicate butterfly overlays in complementary colors
- Sophisticated and artistic nail design
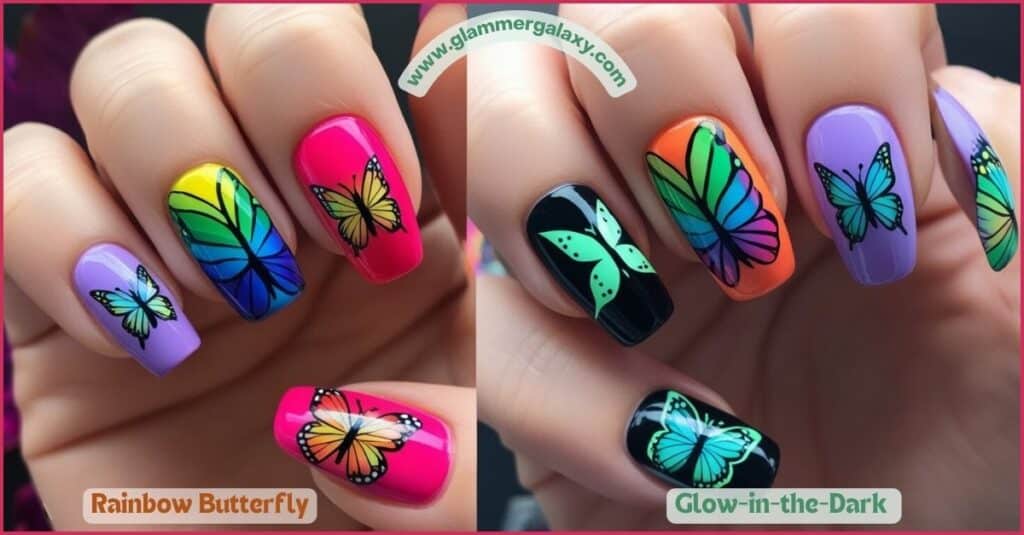
16. Rainbow Butterfly Color Explosion
Celebrate color with vibrant rainbow butterfly nails.
Key Features:
- Each nail featuring a different color of the rainbow
- Butterfly designs that incorporate multiple colors
- Perfect for festivals or bold fashion statements
17. Glow-in-the-Dark Butterfly Designs
Add an element of surprise with glow-in-the-dark butterfly nail art.
Key Features:
- Regular nail art visible in daylight
- Glowing butterfly patterns that appear in the dark
- Playful and unique twist on butterfly nail designs
You might like reading: 30 Stunning Orange Nail Designs to Brighten Your Day
Inspiration from Nature: Butterfly Species and Their Nail Art Counterparts
Nature provides endless inspiration for butterfly nail art. Let’s explore how some of the world’s most beautiful butterfly species can be translated into stunning nail designs.
Morpho Butterfly-Inspired Blue Iridescence
The Morpho butterfly, known for its brilliant blue wings, inspires this dazzling nail art:
- Base Color: Deep blue
- Technique: Use interference pigments for an iridescent effect
- Accent: Silver highlights to mimic light reflection
Swallowtail Butterfly’s Intricate Patterns
The intricate patterns of the Swallowtail butterfly translate beautifully to nail art:
- Base Color: Yellow or black
- Technique: Use fine brushes to recreate detailed wing patterns
- Accent: Add small dots to mimic body spots
Painted Lady Butterfly’s Orange and Black Contrast
The Painted Lady’s striking color combination makes for eye-catching nail art:
- Base Color: Soft orange
- Technique: Create black patterns with a thin brush or stamping
- Accent: Add white spots for authenticity
Seasonal Butterfly Nail Art Ideas
Butterfly nail art can be adapted to suit any season. Here are some ideas to keep your nails on-trend year-round:
Spring: Pastel Butterflies with Floral Accents
Embrace the season of renewal with these spring-inspired nails:
- Soft pastel base colors
- Delicate butterfly designs in complementary hues
- Small floral accents to represent blooming nature
Summer: Bright, Bold Butterfly Designs
Heat up your nail game with vibrant summer butterfly designs:
- Neon colors for maximum impact
- Larger, more prominent butterfly motifs
- Incorporate tropical elements like palm leaves or fruits
Fall: Amber and Gold Butterfly Motifs
Transition into autumn with these warm, rich butterfly designs:
- Base colors in deep reds, oranges, and browns
- Gold or copper butterfly accents
- Consider adding leaf patterns for a true fall feel
Winter: Frosted and Glittery Butterfly Patterns
Bring a touch of whimsy to winter with these frosty butterfly nails:
- Icy blue or white base
- Silver glitter for a snow-like effect
- Delicate, lace-like butterfly patterns
Discover more in this article: 30 Stunning Orange Nail Designs to Brighten Your Day
Butterfly Nail Art for Different Occasions
Butterfly nail art is versatile enough to suit any occasion. Here are some ideas for specific events:
Wedding and Bridal Butterfly Designs
For a romantic and elegant bridal look:
- Soft white or nude base
- Delicate, lace-like butterfly patterns
- Consider a subtle shimmer for added glamour
Festival-Ready Butterfly Nail Art
Make a statement at your next festival with:
- Bold, neon colors
- Large, prominent butterfly designs
- Incorporate holographic or glitter elements
Office-Appropriate Subtle Butterfly Accents
Keep it professional yet stylish with:
- Neutral base colors
- Small, single-color butterfly accents on one or two nails
- Matte finish for a sophisticated touch
Holiday-Themed Butterfly Manicures
Adapt butterfly designs to suit various holidays:
- Christmas: Red and green butterflies with gold accents
- Valentine’s Day: Pink and red heart-shaped butterfly wings
- Halloween: Orange and black butterflies with spiderweb accents
Caring for Your Butterfly Nail Art
To ensure your beautiful butterfly nail art lasts as long as possible, follow these care tips:
Extending the Life of Your Manicure
- Apply a quality top coat every 2-3 days
- Wear gloves when doing household chores
- Moisturize your hands and cuticles regularly
- Avoid exposing nails to extreme temperatures
Touch-Up Techniques
For minor chips or wear:
- Gently buff the affected area
- Apply a small amount of matching polish
- Blend the edges while the polish is wet
- Seal with a top coat
Safe Removal Methods
When it’s time to change your design:
- Soak nails in acetone-based remover for 10-15 minutes
- Gently scrape off loosened polish with a wooden stick
- For stubborn areas, use a cotton ball soaked in remover
- Wash hands and apply cuticle oil after removal
Advanced Butterfly Nail Art Techniques
For those looking to take their butterfly nail art to the next level, consider these advanced techniques:
Layering for Depth and Dimension
Create stunning 3D effects by:
- Starting with a base color
- Adding translucent layers of color for wings
- Using a detail brush to add fine lines and patterns
- Sealing each layer with a thin top coat before adding the next
Mixing Mediums (Gel, Acrylic, Regular Polish)
Combine different nail products for unique effects:
- Use gel polish for the base and regular polish for details
- Create 3D butterfly shapes with acrylic and paint with gel polish
- Experiment with mixing regular polish with acrylic powder for custom colors
Incorporating Real Dried Butterfly Wings (Ethically Sourced)
For a truly unique look:
- Source ethically obtained butterfly wings from reputable suppliers
- Cut tiny sections of wing and apply to a wet top coat
- Seal with another layer of top coat
- Use as an accent on one or two nails for maximum impact
Note: Always ensure that any natural materials used are ethically and legally sourced.
The Psychology of Butterfly Nail Art
The appeal of butterfly nail art goes beyond mere aesthetics. Let’s explore the psychological impact of these winged wonders on our nails.
Color Psychology in Butterfly Designs
Different colors in butterfly nail art can evoke various emotions:
- Blue: Calming, trustworthy
- Yellow: Cheerful, optimistic
- Pink: Romantic, feminine
- Green: Natural, growth-oriented
- Purple: Creative, regal
Emotional Impact of Wearing Butterfly-Inspired Nails
Many people report feeling:
- More confident and self-expressive
- Connected to nature and beauty
- Uplifted and positive
- Reminded of personal growth and transformation
Butterfly Nail Art FAQs
To round out our comprehensive guide, let’s address some frequently asked questions about butterfly nail art.
Q: How long do butterfly nail art designs typically last?
A: With proper care and a quality top coat, most butterfly nail designs can last 1-2 weeks. Factors like your daily activities and the complexity of the design can affect longevity.
Q: Can I create butterfly nail art on short nails?
A: Absolutely! While longer nails provide more canvas space, there are many beautiful butterfly designs suitable for shorter nails. Focus on smaller, simpler butterfly motifs or accent nails.
Q: Are there hypoallergenic options for those with sensitive skin?
A: Yes, many brands offer hypoallergenic nail polishes and products. Look for “5-free” or “7-free” formulas that exclude common irritants. Water-based polishes are another great option for sensitive skin.
Watch this comprehensive video about how to do beautiful Butterfly Nail Art Design
Conclusion: Elevate Your Style with Butterfly-Inspired Nails
Butterfly nail art offers a magical way to express your creativity and add a touch of whimsy to your style. From soft, pastel designs to bold, eye-catching creations, there’s a butterfly nail art style for everyone. Remember, the key to stunning butterfly nails lies in preparation, technique, and a dash of imagination.
So go ahead, let your creativity take flight, and watch as your nails transform into miniature works of art that capture the delicate beauty of butterflies. Happy painting!

Sarah Williams is an experienced blogger and fashion enthusiast at Glammer Galaxy. With a passion for beauty and style, she shares expert insights on hair trends, nail art, and fashion tips. Her creative flair and years of experience make her a go-to source for all things glam!


